Avoid Notch and Safe Area Issues in React Native
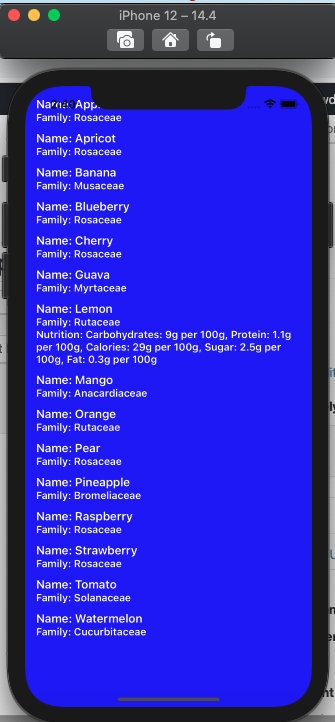
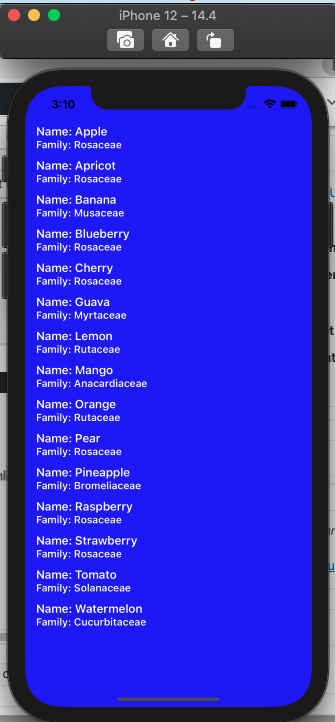
Phones, tablets, and foldables have status bars, notches, camera cutouts, rounded corners, gesture home indicators, and navigation bars. A React Native screen that looks fine on one simulator can still hide content under system UI on another device.
The modern solution is react-native-safe-area-context. The older
SafeAreaView exported from React Native core is deprecated and should not be
the default choice for new work.
Quick Answer
Wrap your app with SafeAreaProvider, then use SafeAreaView or
useSafeAreaInsets from react-native-safe-area-context:
import { SafeAreaProvider, SafeAreaView } from 'react-native-safe-area-context';

export default function App() {
  return (
    <SafeAreaProvider>
      <SafeAreaView edges={['top', 'left', 'right']} style={{ flex: 1 }}>
        {/* App navigation and screens */}
      </SafeAreaView>
    </SafeAreaProvider>
  );
}
If your app uses Expo modules, install the package through Expo so the native version matches your project:
corepack yarn expo install react-native-safe-area-context
For the rest of the local setup, use the React Native development environment guide and the current React Native stack.
Why Hardcoded Padding Fails
Adding paddingTop: 44 or marginBottom: 34 can make one device look correct,
but it creates layout bugs elsewhere. The safe area changes by device, platform,
orientation, call status, navigation mode, modal presentation, and full-screen
system UI.
Use safe area insets when content must avoid:
- the top status bar or camera cutout;
- the bottom home indicator or Android navigation area;
- floating tab bars and action bars;
- full-screen media controls;
- modal roots rendered outside the main navigation tree;
- web layouts that need CSS safe area equivalents.
Install the Safe Area Library
In an Expo or Expo-modules React Native project:
corepack yarn expo install react-native-safe-area-context
In a generic React Native app, follow the package documentation and then rebuild native apps if the native dependency was added:
npm install react-native-safe-area-context
After changing native packages, rebuild iOS and Android. If the native build fails, use React Native Errors and Solutions.
Ship faster with All Access. Get the React Native templates, admin panels, updates, and launch bonuses that help you build faster.
Explore All AccessAdd SafeAreaProvider at the Root
The provider should live above your navigation tree so screens can read the same inset data:
import { SafeAreaProvider } from 'react-native-safe-area-context';
import RootNavigator from './src/navigation/RootNavigator';

export default function App() {
  return (
    <SafeAreaProvider>
      <RootNavigator />
    </SafeAreaProvider>
  );
}
Some modal or screen libraries mount content in a separate native root. If a
modal ignores safe areas, add another SafeAreaProvider at that modal root.
Use SafeAreaView for Screen Containers
For standard screens, the package's SafeAreaView is the simplest option:
import { FlatList, Text } from 'react-native';
import { SafeAreaView } from 'react-native-safe-area-context';

export function NotificationsScreen() {
  return (
    <SafeAreaView edges={['top', 'left', 'right']} style={{ flex: 1 }}>
      <FlatList
        data={notifications}
        keyExtractor={(item) => item.id}
        renderItem={({ item }) => <Text>{item.title}</Text>}
      />
    </SafeAreaView>
  );
}
Choose edges intentionally. A screen with a custom bottom tab bar may want top, left, and right insets on the scroll area, while the tab bar itself handles the bottom inset.
Use useSafeAreaInsets for Custom Layouts
Use the hook when the safe area needs to influence a floating button, keyboard toolbar, media control, or custom navigation element:
import { Pressable, StyleSheet, Text } from 'react-native';
import { useSafeAreaInsets } from 'react-native-safe-area-context';

export function FloatingCheckoutButton() {
  const insets = useSafeAreaInsets();

  return (
    <Pressable style={[styles.button, { bottom: insets.bottom + 16 }]}>
      <Text style={styles.label}>Checkout</Text>
    </Pressable>
  );
}

const styles = StyleSheet.create({
  button: {
    position: 'absolute',
    left: 16,
    right: 16,
    minHeight: 52,
    alignItems: 'center',
    justifyContent: 'center',
    borderRadius: 8,
  },
  label: {
    fontWeight: '700',
  },
});
Do not apply the same inset twice. If a navigator already handles the bottom safe area for tabs, do not also add bottom padding to every child list unless the screen truly needs extra spacing.
Test More Than One Device Shape
Safe area bugs are visual. Before release, check at least:
- iPhone with a notch or Dynamic Island;
- iPhone SE-style screen without a notch;
- Android device with gesture navigation;
- Android emulator with three-button navigation if your audience uses it;
- landscape orientation for media, maps, and checkout flows;
- modals, bottom sheets, and screens with sticky footers.
For app delivery checks, pair this with the React Native release checklist.
Looking for a custom mobile application?
Our team of expert mobile developers can help you build a custom mobile app that meets your specific needs.
Get in TouchFAQ
Should I import SafeAreaView from react-native?
No for new work. Use react-native-safe-area-context; the React Native core
SafeAreaView is deprecated and only covers a narrower set of cases.
Does React Navigation handle safe areas automatically?
React Navigation handles many navigator-level safe areas, but your custom headers, tab bars, modals, floating buttons, and full-screen screens may still need direct inset handling.
Should every screen wrap itself in a safe area?
Most content screens should respect safe areas, but full-screen maps, cameras, and media views often render edge-to-edge and then apply safe areas only to controls.