Building a Music Player in React Native

In today’s article we will build a React Native Music Player, to showcase how easy it is to build a music app in React Native, that is optimized for both native iOS and Android. The project we are going to build will look and behave similar to the Spotify player, that all of us are familiar with. The main goal is to have a basic app with two screens: one with a list of predefined songs and another one with the actual music player.
Music apps are extremely popular nowadays, in the Internet era. Spotify, Apple Music or Youtube Music have had an amazing success among global users. Music is an essential commodity that is used for several reasons ranging from relaxation, therapeutics, partying, self-reflection and so on.
Without further ado, let’s get started with our React Native music player tutorial.
1. Building Out The UI of The React Native Music Player
As we already mentioned, we are going to use the Spotify design as inspiration for our React Native music player. We are going to assume you are already familiar with functional components, hooks, and styling in React Native, so we are going to cut straight to the chase.
As an overview, the list of songs will consist of a list of objects containing the song title, song URL, music art cover and other vital information as shown in the example JSON below:
{
    url: 'https://www.bensound.com/bensound-music/bensound-happyrock.mp3',
    title: 'Happy Rock',
    artist: 'Benjamin Tissot',
    album: "Bensound's rock",
    genre: 'Rock',
    date: '2014-05-20T07:00:00+00:00', // RFC 3339
    artwork: 'https://www.bensound.com/bensound-img/happyrock.jpg', // Load artwork from the network
    duration: 105, // Duration in seconds
}
We hardcoded the list of songs into an array of objects. The list contains music we downloaded from Bensound. For the TrackListScreen we are going to use one external dependency, LinearGradient, to make the UI look more aesthetic by using a gradient. You should install it using the following command:
yarn add react-native-linear-gradient date-fns
Ship faster with All Access. Get the React Native templates, admin panels, updates, and launch bonuses that help you build faster.
Explore All AccessOn iOS, you also need to install the pods using npx pod-install.
We are also going to create a local object up to hold our music library data /data.js at the root of your project:
// data.js
export const musiclibrary = [
  {
    url: "https://www.bensound.com/bensound-music/bensound-happyrock.mp3",
    title: "Happy Rock",
    artist: "Benjamin Tissot",
    album: "Bensound's rock",
    genre: "Rock",
    date: "2014-05-20T07:00:00+00:00", // RFC 3339
    artwork: "https://www.bensound.com/bensound-img/happyrock.jpg", // Load artwork from the network
    duration: 105, // Duration in seconds
  },
  {
    url: "https://www.bensound.com/bensound-music/bensound-anewbeginning.mp3",
    title: "Punky",
    artist: "Benjamin Tissot",
    album: "Bensound's rock",
    genre: "Rock",
    date: "2014-05-20T07:00:00+00:00", // RFC 3339
    artwork: "https://www.bensound.com/bensound-img/punky.jpg",
    duration: 126, // Duration in seconds
  },
  {
    url: "https://www.bensound.com/bensound-music/bensound-actionable.mp3",
    title: "Actionable",
    artist: "Benjamin Tissot",
    album: "Bensound's rock",
    genre: "Rock",
    date: "2014-05-20T07:00:00+00:00", // RFC 3339
    artwork: "https://www.bensound.com/bensound-img/actionable.jpg",
    duration: 122, // Duration in seconds
  },
  {
    url: "https://www.bensound.com/bensound-music/bensound-romantic.mp3",
    title: "Romantic",
    artist: "Benjamin Tissot",
    album: "Bensound's Jazz",
    genre: "Jazz",
    date: "2014-05-20T07:00:00+00:00", // RFC 3339
    artwork: "https://www.bensound.com/bensound-img/romantic.jpg",
    duration: 236, // Duration in seconds
  },
  {
    url: "https://www.bensound.com/bensound-music/bensound-allthat.mp3",
    title: "All That",
    artist: "Benjamin Tissot",
    album: "Bensound's Jazz",
    genre: "Jazz",
    date: "2014-05-20T07:00:00+00:00", // RFC 3339
    artwork: "https://www.bensound.com/bensound-img/allthat.jpg",
    duration: 146, // Duration in seconds
  },
  {
    url: "https://www.bensound.com/bensound-music/bensound-love.mp3",
    title: "Love",
    artist: "Benjamin Tissot",
    album: "Bensound's Jazz",
    genre: "Jazz",
    date: "2014-05-20T07:00:00+00:00", // RFC 3339
    artwork: "https://www.bensound.com/bensound-img/love.jpg",
    duration: 335, // Duration in seconds
  },
  {
    url: "https://www.bensound.com/bensound-music/bensound-dreams.mp3",
    title: "Dreams",
    artist: "Benjamin Tissot",
    album: "Bensound's Electronica",
    genre: "Electronica",
    date: "2014-05-20T07:00:00+00:00", // RFC 3339
    artwork: "https://www.bensound.com/bensound-img/dreams.jpg",
    duration: 310, // Duration in seconds
  },
  {
    url: "https://www.bensound.com/bensound-music/bensound-dance.mp3",
    title: "Love",
    artist: "Benjamin Tissot",
    album: "Bensound's Electronica",
    genre: "Electronica",
    date: "2014-05-20T07:00:00+00:00", // RFC 3339
    artwork: "https://www.bensound.com/bensound-img/dance.jpg",
    duration: 177, // Duration in seconds
  },
];
Next, we set up the UI for the list of tracks src/screens/TrackListScreen.js:
import React, {useEffect, useState} from 'react';
import {
  View,
  Text,
  FlatList,
  StyleSheet,
  Pressable,
  Image,
  SafeAreaView,
  TouchableOpacity,
} from 'react-native';
import {musiclibrary} from '../../data';
import LinearGradient from 'react-native-linear-gradient';
import TrackPlayerScreen from '../../components/TrackPlayerScreen';<br>import PlayIcon from '../../assets/icons/play.png';
import PauseIcon from '../../assets/icons/pause.png';
export default function TrackListScreen() {
  const [selectedMusic, setSelectedMusic] = useState(null);
  const [selectedMusicIndex, setSelectedMusicIndex] = useState(null);
  const [isPlayerModalVisible, setisPlayerModalVisible] = useState(false);
  const [isPlaying, setIsPlaying] = useState(false);
  const [timestamp, setTimestamp] = useState(0);
  const [mode, setMode] = useState('shuffle')
  const PlaylistImageView = () => (
    <>
      <LinearGradient
        colors={['#0000ff', '#00005f', '#191414']}
        style={styles.linearGradient}>
        <Image
          style={{width: 200, height: 200}}
          source={{uri: 'https://www.bensound.com/bensound-img/punky.jpg'}}
        />
      </LinearGradient>
      <TouchableOpacity style={styles.shuffleButtonContainer}>
        <Text style={[styles.shuffleButton]}>SHUFFLE PLAY</Text>
      </TouchableOpacity>
    </>
  );
  const onSelectTrack = async (selectedTrack, index) => {
    setSelectedMusic(selectedTrack);
    setTimestamp(0);
    setSelectedMusicIndex(index);
    // remove TrackPlayer.skip(index);
    // playOrPause();
  };
  const playOrPause = async () => {
    setIsPlaying(!isPlaying);
  };
  const onSeekTrack = newTimeStamp => {
    setTimestamp(newTimeStamp);
  };
  const onPressNext = () => {
    setTimestamp(0);
    setSelectedMusic(
      musiclibrary[(selectedMusicIndex + 1) % musiclibrary.length],
    );
    setSelectedMusicIndex(selectedMusicIndex + 1);
  };
  const onPressPrev = () => {
    if (selectedMusicIndex === 0) {
      return;
    }
    setTimestamp(0);
    setSelectedMusic(
      musiclibrary[(selectedMusicIndex - 1) % musiclibrary.length],
    );
    setSelectedMusicIndex(selectedMusicIndex - 1);
  };
  const renderSingleMusic = ({item, index}) => {
    return (
      <>
        {index === 0 && <PlaylistImageView />}
        <Pressable onPress={() => onSelectTrack(item, index)}>
          <View>
            <Text style={styles.musicTitle}>{item.title}</Text>
            <Text style={styles.artisteTitle}>{item.artist}</Text>
          </View>
        </Pressable>
      </>
    );
  };
  return (
    <View style={styles.container}>
      <SafeAreaView />
      {selectedMusic && (
        < <br>          TrackPlayerScreen
          onCloseModal={() => setisPlayerModalVisible(false)}
          isVisible={isPlayerModalVisible}
          isPlaying={isPlaying}
          playOrPause={playOrPause}
          selectedMusic={selectedMusic}
          onSeekTrack={onSeekTrack}
          timestamp={timestamp}
          onPressNext={onPressNext}
          onPressPrev={onPressPrev}
          playbackMode={mode}<br>          onClickLoop={()=> mood === "loop" ? setMode("loop") : setMode("off")}
        />
      )}
      <View style={[styles.widgetContainer, {justifyContent: 'center'}]}>
        <Text style={styles.musicTitle}>My music</Text>
      </View>
      <FlatList
        data={musiclibrary}
        keyExtractor={item => item.url}
        renderItem={renderSingleMusic}
      />
      {selectedMusic && (
        <Pressable onPress={() => setisPlayerModalVisible(true)}>
          <View style={[styles.widgetContainer, {}]}>
            <View style={{flexDirection: 'row'}}>
              <Image
                resizeMode="cover"
                source={{uri: selectedMusic.artwork}}
                style={styles.widgetImageStyle}
              />
              <View>
                <Text style={styles.widgetMusicTitle}>
                  {selectedMusic.title}
                </Text>
                <Text style={styles.widgetArtisteTitle}>
                  {selectedMusic.artist}
                </Text>
              </View>
            </View>
            <Pressable onPress={() => playOrPause()}>
              <Image
                source={isPlaying ? PauseIcon : PlayIcon}<br>                style={{height: 30, tintColor: '#fff', width: 30}}
              />
            </Pressable>
          </View>
        </Pressable>
      )}
    </View>
  );
}
const styles = StyleSheet.create({
  container: {
    flex: 1,
    backgroundColor: '#191414',
  },
  musicTitle: {
    fontSize: 22,
    color: '#fff',
    fontWeight: '500',
    marginTop: 12,
    marginHorizontal: 20,
    marginBottom: 1,
  },
  artisteTitle: {
    fontSize: 16,
    color: '#fff',
    opacity: 0.8,
    marginHorizontal: 20,
    marginBottom: 12,
    marginTop: 1,
  },
  widgetContainer: {
    flexDirection: 'row',
    justifyContent: 'space-between',
    alignItems: 'center',
    paddingHorizontal: 0,
    height: 60,
    width: '100%',
    backgroundColor: '#5E5A5A',
  },
  widgetMusicTitle: {
    fontSize: 18,
    color: '#fff',
    fontWeight: '500',
    marginTop: 12,
    marginHorizontal: 10,
    marginBottom: 1,
  },
  widgetArtisteTitle: {
    fontSize: 14,
    color: '#fff',
    opacity: 0.8,
    marginHorizontal: 10,
    marginBottom: 12,
    marginTop: 1,
  },
  widgetImageStyle: {
    width: 55,
    height: 60,
    marginTop: 3,
  },
  linearGradient: {
    width: '100%',
    height: 250,
    justifyContent: 'center',
    alignItems: 'center',
  },
  shuffleButton: {
    color: '#fff',
    fontSize: 24,
    fontWeight: 'bold',
  },
  shuffleButtonContainer: {
    paddingVertical: 15,
    paddingHorizontal: 35,
    borderRadius: 40,
    alignSelf: 'center',
    backgroundColor: '#1DB954',
  },
});
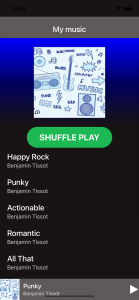
If you are running your app, the screen should look like this. It looks pretty close to the Spotify music player, right?
What is a music player app without a whole screen to display the player, right? So let’s create a new modal screen components/TrackPlayerScreen.js. On this screen, we need just one additional external dependency @react-native-community/slider to display the progress of the current playing track. So let’s install it by running the following commands:
yarn madd @react-native-community/slider && npx pod-install
Ship faster with All Access. Get the React Native templates, admin panels, updates, and launch bonuses that help you build faster.
Explore All AccessNote: Make sure to download the image assets from the repository, and place them into your React Native Music Player project.
import React from 'react';
import {View, Text, Modal, Image, StyleSheet, Pressable} from 'react-native';
import Slider from '@react-native-community/slider';
import LinearGradient from 'react-native-linear-gradient';
import ShuffleIcon from '../assets/icons/shuffle.png';
import PrevIcon from '../assets/icons/prev.png';
import NextIcon from '../assets/icons/next.png';
import LoopIcon from '../assets/icons/loop.png';
import PlayIcon from '../assets/icons/play.png';
import PauseIcon from '../assets/icons/pause.png';
import MenuIcon from '../assets/icons/down.png';
import {secsToTimestamp} from '../util/timeFormat';
export default function TrackPlayerScreen({
  isVisible,
  onCloseModal,
  selectedMusic,
  isPlaying,
  playOrPause,
  onSeekTrack,
  timestamp,
  onPressNext,
  onPressPrev,
  playbackMode,
  onClickShuffle,
  onClickLoop,
}) {
  return (
    <Modal
      animationType="slide"
      visible={isVisible}
      presentationStyle="fullScreen">
      <LinearGradient
        colors={['#0000ff', '#00005f', '#191414']}
        style={styles.container}>
        <Pressable
          onPress={onCloseModal}
          style={{
            position: 'absolute',
            top: 45,
            left: 30,
          }}>
          <Image
            source={MenuIcon}
            style={{
              width: 15,
              height: 15,
              tintColor: '#fff',
            }}
          />
        </Pressable>
        <Text style={styles.mainText}>Playing from My Playlist</Text>
        <Text style={[styles.mainText, {fontWeight: 'bold'}]}>
          {selectedMusic.album}
        </Text>
        <Image
          style={{width: 350, height: 350, marginVertical: 75}}
          source={{uri: selectedMusic.artwork}}
        />
        <View style={{justifyContent: 'space-between', width: '100%'}}>
          <View>
            <Text style={styles.boldMainText}>{selectedMusic.title}</Text>
            <Text style={styles.mainText}>{selectedMusic.artist}</Text>
          </View>
          <Text>Like</Text>
        </View>
        <Slider
          tapToSeek={true}
          minimumTrackTintColor="#fff"
          onValueChange={e => {
            onSeekTrack(Math.floor(e * selectedMusic.duration));
          }}
          style={{width: '100%', paddingHorizontal: 10}}
          value={timestamp / selectedMusic.duration}
        />
        <View
          style={{
            flexDirection: 'row',
            justifyContent: 'space-between',
            width: '100%',
          }}>
          <Text style={styles.mainText}>{secsToTimestamp(timestamp)}</Text>
          <Text style={styles.mainText}>
            {secsToTimestamp(selectedMusic.duration - timestamp)}
          </Text>
        </View>
        <View style={styles.timeStampHolder}>
          <View/>
          <Pressable onPress={onPressPrev}>
            <Image style={styles.iconWidth} source={PrevIcon} />
          </Pressable>
          <Pressable onPress={playOrPause} style={styles.playButtonHolder}>
            <Image
              style={[styles.iconWidth, {tintColor: '#000'}]}
              source={isPlaying ? PauseIcon : PlayIcon}<br>            />
          </Pressable>
          <Pressable onPress={onPressNext}>
            <Image style={styles.iconWidth} source={NextIcon} />
          </Pressable>
          <Pressable onPress={onClickLoop}>
            <Image
              style={[
                styles.iconWidth,
                {tintColor: playbackMode === 'loop' ? '#1DB954' : '#fff'},
              ]}
              source={LoopIcon}
            />
          </Pressable>
        </View>
      </LinearGradient>
    </Modal>
  );
}
const styles = StyleSheet.create({
  container: {
    flex: 1,
    backgroundColor: '#191414',
    alignItems: 'center',
    paddingHorizontal: 10,
    paddingTop: 40,
    paddingBottom: 20,
  },
  boldMainText: {
    fontSize: 22,
    color: '#fff',
    fontWeight: '500',
    marginTop: 12,
    marginHorizontal: 20,
    marginBottom: 1,
  },
  mainText: {
    fontSize: 16,
    color: '#fff',
    opacity: 0.8,
    marginHorizontal: 20,
    // marginBottom: 12,
    // marginTop: 1,
  },
  linearGradient: {
    width: '100%',
    height: 250,
    justifyContent: 'center',
    alignItems: 'center',
  },
  iconWidth: {
    width: 30,
    height: 30,
    tintColor: '#fff',
  },
  timeStampHolder: {
    width: '100%',
    justifyContent: 'space-between',
    flexDirection: 'row',
    alignItems: 'center',
    marginTop: 10,
    paddingHorizontal: 10,
  },
  playButtonHolder: {
    width: 70,
    height: 70,
    borderRadius: 35,
    backgroundColor: '#fff',
    alignItems: 'center',
    justifyContent: 'center',
  },
});
We’re almost done getting the UI ready. The one last step here is to add the helper module util/timeFormat.js to our React Native mobile project so that we can format the timestamp to a proper readable form:
import { secondsToMinutes } from "date-fns";
export const secsToTimestamp = (seconds) => {
  console.log(seconds);
  const mins = secondsToMinutes(seconds);
  const secs = seconds % 60 < 10 ? `0${seconds % 60}` : seconds % 60;
  return `${mins}:${secs}`;
};
then update the App.js
import React from "react";
import TrackListScreen from "./src/screens/TrackListScreen";
export default function App() {
  return <TrackListScreen />;
}
Run your app with yarn ios to see how the app looks and feels.
2. Create the Music Player in React Native
Let’s finally add the ability to play audio songs in React Native. This is the core functionality of the React Native Music Player so we are going to get into a lot more details with regards to the implementation.
There are a myriad of React Native NPM packages that we could use to get the audio tracks to be played in our mobile app, but react-native-track-player serves the purpose of this article which are audio streaming, seeking tracks and skipping tracks. Let’s grab the package and install it in our app project. Please pay attention to all important steps, to avoid crashing the app.
a. Installation
yarn install react-native-track-player && npx pod-install
b. Setup
Open Xcode and navigate to File > New > File and create any Swift file using your preferred name. A prompt will open and you should click on Create Bridging Header.
Note: You do not have to put the created Swift file on version control.
c. Implementation
We need to configure the react-native-track-player on our App.js and add our track objects:
import React, {useEffect} from 'react';
import TrackListScreen from './src/screens/TrackListScreen';<br>import TrackPlayer from 'react-native-track-player';
import {musiclibrary} from './data';
export default function App() {
  const setup = async () => {
    await TrackPlayer.setupPlayer({});
    await TrackPlayer.add(musiclibrary);
  };
  useEffect(() => {
    setup();
  }, []);
  return < TrackPlayerScreen />;<br>}
Next, we need to create listeners to our src/screens/TrackListScreen.js and update our playOrPause function.
....
....
import TrackPlayer, {
  useTrackPlayerEvents,
  Event,
  State,
} from 'react-native-track-player';
const events = [
  Event.PlaybackState,
  Event.PlaybackError,
  Event.RemotePlay,
  Event.RemotePause,
];
export default function PlayerHome() {
....
....
  useTrackPlayerEvents(events, event => {
    if (event.type === Event.PlaybackError) {
      console.warn('An error occurred while playing the current track.');
    }
    if (event.type === Event.PlaybackState) {
      console.log(event.type);
    }
    if (event.type === Event.RemotePlay) {
      console.log(event.type);
    }
    if (event.type === Event.RemotePause) {
      console.log(event.type);
    }
  });
  const playOrPause = async isCurrentTrack => {
    const state = await TrackPlayer.getState();
    if (state === State.Paused && isCurrentTrack) {
      setIsPlaying(!isPlaying);
      TrackPlayer.play();
      return;
    }
    if (state === State.Playing && isCurrentTrack) {
      setIsPlaying(!isPlaying);
      TrackPlayer.pause();
      return;
    }
    setIsPlaying(true);
    TrackPlayer.play();
  };<br>....<br>....
}
With this, we now have a working music player: a list of songs and a music player widget to play and pause the given songs.
Run your app and enjoy listening to any song you like from the list.
Let’s add even more functionality.
3. Adding All Playback Buttons to The Music Player
There are some important functionalities that a basic music player needs to incorporate:
a. Show the current playback time while playing a song (together with duration)
b. Next and previous buttons to skip tracks forward and backward respectively.
c. Repeat mode
Displaying the playback time of the current song
Any music player has a slider, which looks like a progress bar, showing how much time the song has until it’s finished. The slider needs to be able to control the timestamp and update itself depending on the position of the current playing track. So we need to fetch the position of the current track and pass it to the TrackPlayerScreen as the timestamp.
Let’s see how the code looks like:
const {position} = useProgress();
const onSeekTrack = newTimeStamp => {
  TrackPlayer.seekTo(newTimeStamp);
};
return(
  <PlayerModal
  ...
  timestamp={Math.round(position)}
  ...
  />
)
Next / Previous Playback Buttons
The skip buttons so far only update the widget UIs we created so to hook it up to the track player we need to modify the implementations of onPressNext and onPressPrev:
const onPressNext = () => {
  setSelectedMusic(
    musiclibrary[(selectedMusicIndex + 1) % musiclibrary.length]
  );
  setSelectedMusicIndex(selectedMusicIndex + 1);
  TrackPlayer.skipToNext();
  playOrPause();
};
const onPressPrev = () => {
  if (selectedMusicIndex === 0) {
    return;
  }
  setSelectedMusic(
    musiclibrary[(selectedMusicIndex - 1) % musiclibrary.length]
  );
  setSelectedMusicIndex(selectedMusicIndex - 1);
  TrackPlayer.skipToPrevious();
  playOrPause();
};
Repeat Button
Who doesn’t want a repeat button to use when an amazing song comes up? Let’s also see how we can add this amazing feature to our React Native Music Player.
First, let’s add a useEffect hook to the src/screens/TrackListScreen.js file, that will listen on the repeat mode changes and reset the TrackPlayer accordingly.
//import {RepeatMode} from 'react-native-track-player'useEffect(
  () =>
    mode === 'off'
      ? TrackPlayer.setRepeatMode(RepeatMode.Queue)
      : TrackPlayer.setRepeatMode(RepeatMode.Off),
  [mode],
);