Flipper is a tool built by Meta (former Facebook) to aid in debugging React Native mobile applications (Android, iOS and Web). In this tutorial we’re going to explore how to debug React Native apps with Flipper.
Facebook’s initial goal of building Flipper was to facilitate debugging and reduce the turnaround time spent in shipping mobile development apps. The Flipper desktop app contains various helpful features such as neat Logs, Layout Inspector and Network Inspector tools provided to you as plugins. In addition to that I will be showing you how to build your own plugins.
react-native init flipper_tutorial
Installing Flipper in React Native Apps
To install Flipper head over to the homepage and click on your preferred target OS to download the zip file. 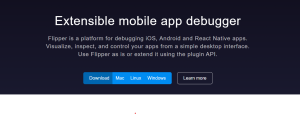 Then proceed to run the flipper.exe file located inside the unzipped folder (if you are on Windows – on MacOS simply open the .dmg file).
Configuring Flipper in React Native
React Native < 0.62 (Skip if you have +0.62)
For Android ,add these to your dependencies in android/app/build.gradle
implementation "androidx.swiperefreshlayout:swiperefreshlayout:1.0.0"
debugImplementation("com.facebook.flipper:flipper:${FLIPPER_VERSION}") {
  exclude group:'com.facebook.fbjni'
}
debugImplementation("com.facebook.flipper:flipper-network-plugin:${FLIPPER_VERSION}") {
    exclude group:'com.facebook.flipper'
}
debugImplementation("com.facebook.flipper:flipper-fresco-plugin:${FLIPPER_VERSION}") {
    exclude group:'com.facebook.flipper'
}
Create a file android/app/src/debug/java/com/flippertutorial/ReactNativeFlipper.java
/**
 * Copyright (c) Facebook, Inc. and its affiliates.
 *
 * <p>This source code is licensed under the MIT license found in the LICENSE file in the root
 * directory of this source tree.
 */
package com.rndiffapp;
import android.content.Context;
import com.facebook.flipper.android.AndroidFlipperClient;
import com.facebook.flipper.android.utils.FlipperUtils;
import com.facebook.flipper.core.FlipperClient;
import com.facebook.flipper.plugins.crashreporter.CrashReporterPlugin;
import com.facebook.flipper.plugins.databases.DatabasesFlipperPlugin;
import com.facebook.flipper.plugins.fresco.FrescoFlipperPlugin;
import com.facebook.flipper.plugins.inspector.DescriptorMapping;
import com.facebook.flipper.plugins.inspector.InspectorFlipperPlugin;
import com.facebook.flipper.plugins.network.FlipperOkhttpInterceptor;
import com.facebook.flipper.plugins.network.NetworkFlipperPlugin;
import com.facebook.flipper.plugins.react.ReactFlipperPlugin;
import com.facebook.flipper.plugins.sharedpreferences.SharedPreferencesFlipperPlugin;
import com.facebook.react.ReactInstanceManager;
import com.facebook.react.bridge.ReactContext;
import com.facebook.react.modules.network.NetworkingModule;
import okhttp3.OkHttpClient;
public class ReactNativeFlipper {
  public static void initializeFlipper(Context context, ReactInstanceManager reactInstanceManager) {
    if (FlipperUtils.shouldEnableFlipper(context)) {
      final FlipperClient client = AndroidFlipperClient.getInstance(context);
      client.addPlugin(new InspectorFlipperPlugin(context, DescriptorMapping.withDefaults()));
      client.addPlugin(new ReactFlipperPlugin());
      client.addPlugin(new DatabasesFlipperPlugin(context));
      client.addPlugin(new SharedPreferencesFlipperPlugin(context));
      client.addPlugin(CrashReporterPlugin.getInstance());
      NetworkFlipperPlugin networkFlipperPlugin = new NetworkFlipperPlugin();
      NetworkingModule.setCustomClientBuilder(
          new NetworkingModule.CustomClientBuilder() {
            @Override
            public void apply(OkHttpClient.Builder builder) {
              builder.addNetworkInterceptor(new FlipperOkhttpInterceptor(networkFlipperPlugin));
            }
          });
      client.addPlugin(networkFlipperPlugin);
      client.start();
      // Fresco Plugin needs to ensure that ImagePipelineFactory is initialized
      // Hence we run if after all native modules have been initialized
      ReactContext reactContext = reactInstanceManager.getCurrentReactContext();
      if (reactContext == null) {
        reactInstanceManager.addReactInstanceEventListener(
            new ReactInstanceManager.ReactInstanceEventListener() {
              @Override
              public void onReactContextInitialized(ReactContext reactContext) {
                reactInstanceManager.removeReactInstanceEventListener(this);
                reactContext.runOnNativeModulesQueueThread(
                    new Runnable() {
                      @Override
                      public void run() {
                        client.addPlugin(new FrescoFlipperPlugin());
                      }
                    });
              }
            });
      } else {
        client.addPlugin(new FrescoFlipperPlugin());
      }
    }
  }
}
And lastly add these two lines to the bottom of your gradle.properties
# Version of flipper SDK to use with React Native
FLIPPER_VERSION=0.37.0
For iOS, run the following in the root folder of your application
cd ios && pod install
For apps with React Native version 0.62+, Flipper is configured by default hence opening your Flipper desktop you will see your React Native logs displayed as follows. If you observe closely you will see that the logs are better structured than the ones the logs displayed on the command line 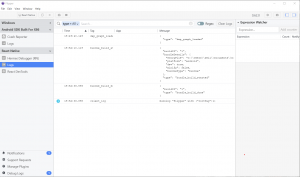 Clicking on the React Native dev tools you will see a map of the components/views on your test application:
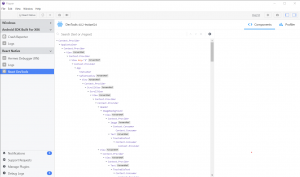
How To Debug React Native Code with Flipper
Building a desktop plugin – I’ve built out a small React Native app (an app that displays beer recipes) to help illustrate this.
const App = () => {

  const [beerRecipes, setBeerRecipes] = useState([])

  useEffect(()=> {
    fetchBeerRecipes()
  }, [])

  const fetchBeerRecipes = async () => {
    const resp = await fetch('https://api.punkapi.com/v2/beers?page=1&per_page=12', {method: "GET"})
    const respJson =await resp.json();
    console.log(respJson[0])
    setBeerRecipes(respJson)

  }

  const renderCountries = recipe => (
    <View style={styles.listItemContainer} >
      <Image style={styles.listItemImage} resizeMode={'contain'} source={{uri: recipe.image_url}} />
      <View>
        <Text style={styles.listTitle} >{recipe.name}</Text>
        <Text style={styles.listDescription} >Brewer Tip: {recipe.brewers_tips}</Text>
      </View>
    </View>

  )

  return (
    <>
      <View style={styles.container} >
          <Text style={styles.title} >List of beer recipes</Text>
          <FlatList
            data={beerRecipes}
            keyExtractor={item=> item.name}
            renderItem={({item}) => renderCountries(item)}
          />
      </View>
    </>
  );
};
And we have this simple UI displaying the names of beer recipes and the brewer tip for each of them. 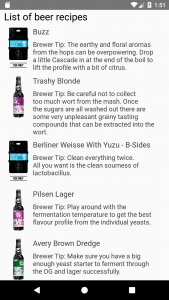 There are three kinds of plugins, Android SDK, iOS, React Native and Desktop. The way the plugins works is that a plugin on the Desktop app must have a corresponding plugin on the target mobile device for a bi-directional communication. Both the features we have seen so far are desktop plugins provided out of the box by Flipper but don’t worry we will be creating one now. First off all install the Flipper package:
yarn global add flipper-pkg
That’s it. We’ve illustrated how to configure Flipper in your React Native apps, and learned how to debug various areas of your codebase by leveraging the Flipper debugging tool in React Native.
Let us know in the comments if you encounter any issues, when following the steps above.